Picture this: you’re eagerly anticipating a lush and vibrant garden, ready to bestow your love and care with the gentle touch of a spray nozzle. But wait, as you reach for your trusty watering wand, a disheartening discovery strikes—a persistent leak marring its once-pristine surface. Despair not, for this guide will equip you with the skills and knowledge to conquer this seemingly daunting task and restore your spray nozzle to its former glory.

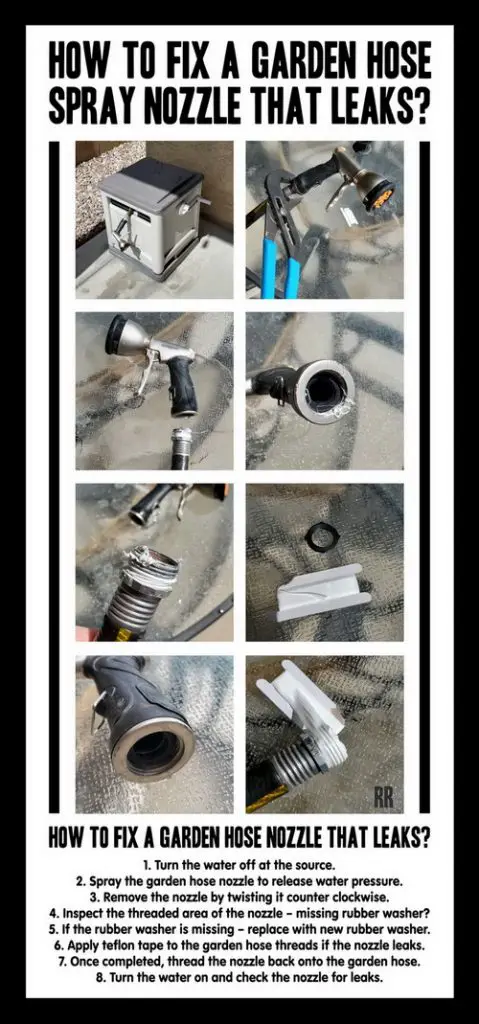
Image: removeandreplace.com
Before delving into the intricacies of nozzle repair, let’s acknowledge the invaluable role it plays in nurturing your botanical haven. A properly functioning spray nozzle allows you to customize the flow and direction of water, delivering gentle hydration to delicate seedlings, invigorating vibrant blooms, and effectively cleansing patios and walkways. With its versatile nature, it becomes an indispensable tool in every gardener’s arsenal.
Delving into the Anatomy of a Spray Nozzle
To embark on the repair journey, it’s imperative to familiarize ourselves with the inner workings of a spray nozzle. Typically, it comprises several key components, including:
- Nozzle head: The heart of the nozzle, where water exits and is shaped into various spray patterns.
- Handle: Provides a comfortable grip for controlling the flow of water.
- Hose connector: Attaches the nozzle to the garden hose, ensuring a secure water supply.
- Internal components: Hidden within the nozzle, these intricate parts regulate water flow and spray patterns.
Understanding this composition will guide us in pinpointing the source of the leak and selecting the appropriate repair strategy.
Troubleshooting Common Spray Nozzle Leaks
Now that we have a grasp of a spray nozzle’s anatomy, let’s delve into the common culprits responsible for those pesky leaks:
- Loose connections: Over time, vibrations and movement can loosen the connections between the nozzle head, handle, and hose connector, leading to water seepage.
- Damaged O-rings: These rubber gaskets form watertight seals within the nozzle, preventing leaks. However, repeated use or exposure to harsh chemicals can compromise their integrity.
- Clogged nozzle head: Dirt, debris, or mineral deposits can accumulate in the nozzle head, obstructing water flow and causing leaks.
- Worn internal parts: With prolonged use, certain internal components, such as springs or washers, can wear down, affecting the nozzle’s ability to regulate water flow.
Identifying the underlying cause is crucial for selecting the most effective repair solution.
Fixing a Leaky Spray Nozzle: A Step-by-Step Guide
Armed with the knowledge of potential leak sources, let’s embark on the step-by-step repair process:
- Gather your tools: You’ll need a wrench, pliers, replacement O-rings (if necessary), and a cloth or rag.
- Disconnect the nozzle: Turn off the water supply and disconnect the spray nozzle from the garden hose.
- Check for loose connections: Inspect the connections between the nozzle head, handle, and hose connector. Tighten any loose connections with a wrench or pliers.
- Examine O-rings: Remove the nozzle head to access the O-rings. Check for any cracks, tears, or deformities. Replace damaged O-rings with new ones of the same size and type.
- Clean the nozzle head: Use a cloth or rag to remove any dirt, debris, or mineral deposits from the nozzle head. Ensure the holes are clear and unobstructed.
- Inspect internal parts: If the leak persists after addressing the previous steps, it may indicate worn internal parts. Consider replacing the entire nozzle head or seeking professional assistance.
- Reassemble the nozzle: After resolving the leak, reassemble the nozzle by attaching the nozzle head to the handle and connecting it to the hose. Tighten all connections securely.
- Test the nozzle: Turn on the water supply and test the spray nozzle. Adjust the spray pattern as desired and check for any remaining leaks.

Image: www.ehow.com
Expert Insights and Actionable Tips
To enhance your spray nozzle repair prowess, heed these expert insights:
- Regular maintenance matters: Extend the lifespan of your spray nozzle by periodically checking connections, cleaning the nozzle head, and replacing O-rings as needed.
- Choose durable materials: Opt for spray nozzles constructed from corrosion-resistant materials like brass or stainless steel to withstand outdoor elements.
- Store properly: Protect your spray nozzle from freezing temperatures by draining it and storing it indoors during winter months.
By incorporating these tips, you’ll minimize the likelihood of future leaks and ensure your spray nozzle remains a reliable gardening companion.
How To Fix A Leaky Spray Nozzle
https://youtube.com/watch?v=U-7O03JnVCY
Conclusion: Empowering You to Conquer Leaky Spray Nozzles
With the knowledge imparted in this comprehensive guide, you are now equipped to tackle leaky spray nozzles with confidence. Remember, the key to successful repairs lies in identifying the underlying cause, selecting the appropriate solution, and implementing it with precision. As you tend to your spray nozzle, take pride in the satisfaction of restoring its functionality and ensuring uninterrupted water flow for your beloved plants. Happy gardening!