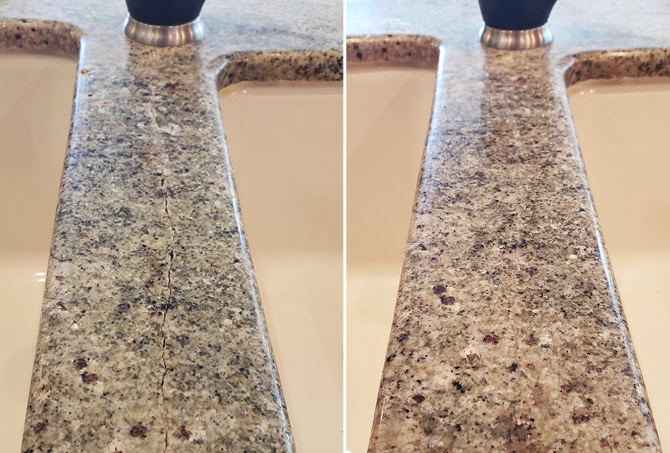
Imagine the dismay of finding a jagged fracture marring the once-pristine surface of your granite countertop. Whether it’s a hairline crack or a gaping fissure, a compromised countertop can lead to structural instability and unsightly aesthetics. But fret not, for in this comprehensive guide, we’ll delve into the why and how of repairing cracked granite countertops, empowering you to restore your kitchen to its former glory.

Image: www.beyondstonesolutions.com
Why Granite Countertops Crack
Granite, an igneous rock formed deep within the earth’s crust, is renowned for its durability and resistance to scratches and heat. However, it’s not immune to cracking under certain circumstances.
-
Impact Damage: The most common cause of granite countertop cracks is blunt force trauma, such as dropping a heavy pot or blunt object on the surface.
-
Thermal Shock: Sudden temperature changes can also cause granite to crack. Rapid heating or cooling, such as placing a hot pan directly on a cold countertop, can create thermal stress that leads to fractures.
-
Underlying Structural Issues: Less commonly, cracks can be a symptom of underlying structural issues, such as a weak foundation or uneven support beneath the countertop.
Repairing Cracked Granite Countertops: Choosing the Right Adhesive
Before embarking on repairs, it’s crucial to select the appropriate adhesive. The choice depends on several factors, including the size and type of crack, the desired finish, and the amount of epoxy required.
-
Color-Matched Epoxies: For inconspicuous repairs of hairline cracks and small chips, color-matched epoxies are ideal. They come in a wide variety of colors to blend seamlessly with the surrounding granite, making them virtually invisible.
-
Clear Epoxies: When repairing larger cracks, clear epoxies are preferred. They provide superior strength and structural integrity, ensuring the repair will withstand daily use.
-
Granite Repair Kits: Comprehensive repair kits, specifically designed for granite countertops, typically include everything needed for the repair, including multiple epoxy colors, mixing tools, and step-by-step instructions.
Repairing Cracked Granite Countertops: Step-by-Step
Once the appropriate adhesive is selected, repairing the cracked granite countertop becomes a meticulous process that requires careful attention to detail.
-
Clean and Prepare the Surface: Thoroughly clean the damaged area with a degreaser and allow it to dry completely. Tape off the surrounding area to protect it from epoxy.
-
Repair the Crack: Using the adhesive dispenser or a mixing palette, prepare the epoxy according to the manufacturer’s instructions. For large cracks, place small pieces of granite or ceramic along the crack to provide internal support. Apply the epoxy into the crack, ensuring it fills all voids.
-
Smoothing and Shaping: Once the epoxy is applied, use a putty knife or tongue depressor to smooth the surface. For larger cracks, you may need to shape the epoxy to match the surrounding granite profile.
-
Curing and Finishing: Most epoxies take several hours to days to fully cure. Remove the tape and gently wipe away any excess epoxy. Allow the repaired area to cure completely before using the countertop.
DIY Considerations: Skill and Confidence Required
Granite countertop repair requires a certain level of skill and confidence in handling adhesives, especially for larger cracks. If you’re uncertain about your abilities, consider consulting a professional for a seamless and guaranteed repair.
Prevention and Maintenance for Durable Countertops
Preventing cracks in the first place is the best form of preservation. Here are some proactive measures to safeguard your granite countertops:
-
Use Placemats and Trivets: Place mats and trivets provide a protective barrier between hot dishes and the countertop, reducing the risk of thermal shock.
-
Avoid Direct Impacts: Handle heavy objects with care and avoid dropping them on the countertop.
-
Proper Installation and Support: Ensure the granite countertop is correctly installed with adequate support and a reinforced base.
-
Regular Cleaning: Regular cleaning helps remove abrasive particles and dirt that can weaken the surface over time. Use a non-abrasive cleaner specifically formulated for granite countertops.
Conclusion
With a little bit of patience and the right tools, repairing cracked granite countertops is an achievable task. By following the steps outlined in this comprehensive guide, you can restore your countertop to its original beauty and functionality, saving yourself time, money, and frustration. Remember, prevention is key, so take care to handle your countertops with care and maintain them properly for years of enduring elegance.

Image: www.mrkitchenfaucets.com
How To Fix Cracked Granite Countertop